Mastering the Minecraft Villager Trading Chart: A Comprehensive Guide
For seasoned Minecraft players and newcomers alike, understanding the villager trading chart is crucial for efficient resource acquisition and game progression. Villagers, those quirky inhabitants of Minecraft villages, offer a wide array of trades, from essential building blocks to rare enchanted items. This comprehensive guide delves into the intricacies of the villager trading chart, providing you with the knowledge to optimize your trading strategies and unlock the full potential of these valuable NPCs. Understanding the villager trading chart is critical to efficient game play.
Why Understanding the Villager Trading Chart is Essential
The villager trading chart is more than just a list of items; it’s a dynamic system influenced by various factors, including villager profession, experience level, and even your reputation within the village. Mastering this system allows you to:
- Acquire Rare Resources: Obtain diamonds, emeralds, enchanted books, and other valuable items that can be difficult or time-consuming to find through exploration or mining.
- Optimize Resource Management: Trade common resources like wheat, carrots, or paper for more valuable items, streamlining your resource gathering efforts.
- Enhance Gameplay: Access powerful tools, weapons, and armor through villager trades, significantly improving your survivability and efficiency.
- Build a Thriving Village Economy: Establish a network of villagers with complementary trades, creating a self-sustaining economy within your Minecraft world.
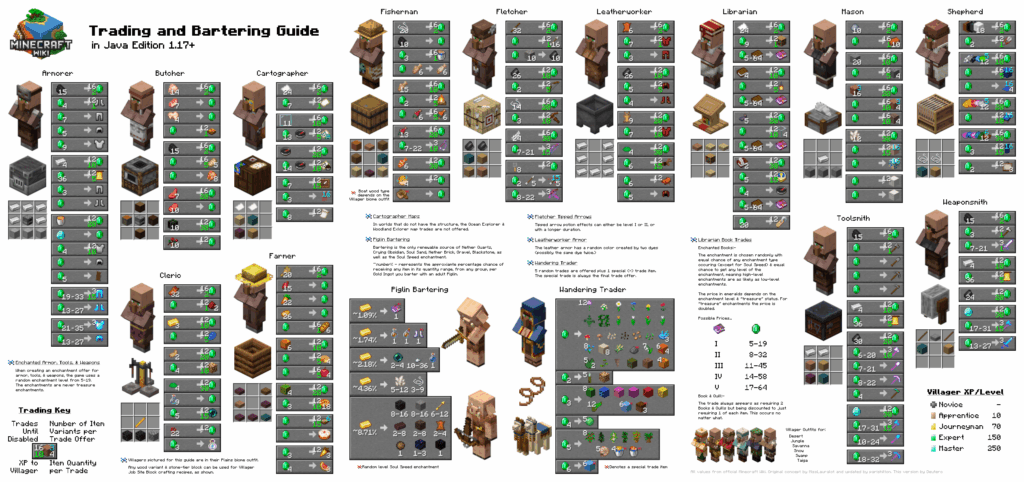
Decoding the Villager Professions and Their Trades
Each villager profession offers a unique set of trades, dictated by the villager trading chart. Recognizing these professions and their associated trades is the first step towards mastering the system:
Armorer
Armorers specialize in trading armor pieces, iron, coal, and sometimes enchanted armor. They can be identified by their blast furnace workstation.
Butcher
Butchers trade various food items like raw and cooked meats, as well as sweet berries and rabbit stew. Their workstation is the smoker.
Cartographer
Cartographers are your go-to source for maps, including ocean explorer maps and woodland explorer maps. They also trade paper and compasses. Their workstation is the cartography table.
Cleric
Clerics trade rotten flesh for emeralds, as well as healing potions, ender pearls, and lapis lazuli. Their workstation is the brewing stand.
Farmer
Farmers trade various crops like wheat, carrots, potatoes, and beetroots for emeralds. They also buy bone meal. Their workstation is the composter.
Fisherman
Fishermen trade fish, coal, and sometimes enchanted fishing rods. Their workstation is the barrel.
Fletcher
Fletchers trade arrows, feathers, flint, and enchanted bows. Their workstation is the fletching table.
Leatherworker
Leatherworkers trade leather, rabbit hides, and leather armor. Their workstation is the cauldron.
Librarian
Librarians are highly sought after for their enchanted books, bookshelves, and name tags. They also trade paper and books. Their workstation is the lectern. The villager trading chart for librarians is particularly valuable.
Mason
Masons trade stone, clay, bricks, and other building blocks. Their workstation is the stonecutter.
Nitwit
Nitwits are villagers with no profession and cannot trade. They are easily identifiable by their green robes.
Shepherd
Shepherds trade wool, dyes, and sometimes banners. Their workstation is the loom.
Toolsmith
Toolsmiths trade tools, iron, coal, and sometimes enchanted tools. Their workstation is the smithing table.
Weaponsmith
Weaponsmiths trade weapons, iron, coal, and sometimes enchanted weapons. Their workstation is the grindstone.
Understanding Villager Trading Levels and Locking Trades
Villagers have trading levels, which increase as you trade with them. As they level up, they unlock new trades according to the villager trading chart. Here’s a breakdown of the levels:
- Novice: The starting level, offering a limited selection of basic trades.
- Apprentice: Unlocks more advanced trades.
- Journeyman: Further expands the trade options.
- Expert: Offers a wide range of valuable trades.
- Master: The highest level, providing access to the most sought-after items and enchantments.
It’s important to note that villagers can sometimes lock trades, meaning they temporarily become unavailable. This can happen if you trade too much of a particular item or if the villager hasn’t had time to restock. To unlock a locked trade, simply wait for the villager to work at their workstation. They will restock their trades twice a day, once when they work in the morning and again in the afternoon.
Manipulating the Villager Trading Chart: Tips and Tricks
While the villager trading chart is largely predetermined, there are ways to influence and manipulate it to your advantage:
- Curing Zombie Villagers: Curing a zombie villager will significantly reduce the prices of their trades, making it a cost-effective way to acquire valuable items. This discount is temporary but can be refreshed by re-infecting and re-curing the villager.
- Village Reputation: Your reputation within a village affects villager prices. Saving villagers from raids or defending the village from hostile mobs will improve your reputation, leading to lower prices. Conversely, harming villagers or stealing from the village will negatively impact your reputation, resulting in higher prices.
- Workstation Placement: Placing or breaking a villager’s workstation can reset their profession, allowing you to potentially cycle through different trades until you find the desired ones. However, be cautious, as this can also result in the villager becoming a Nitwit if they can’t access a workstation.
- Breeding Villagers: Breeding villagers is a great way to increase the population of your village and potentially acquire villagers with desirable trades. Ensure you have enough beds and food available for the villagers to breed.
Advanced Villager Trading Strategies
For experienced players, advanced villager trading chart strategies can significantly optimize resource acquisition and gameplay:
The Mending Librarian
One of the most sought-after trades is the Mending enchantment, offered by Librarian villagers. To acquire a Mending Librarian, repeatedly place and break a lectern near an unemployed villager until they become a Librarian offering the Mending enchantment. This can be a time-consuming process, but the reward is well worth the effort.
The Zero Tick Sugar Cane Farm
Combine a zero-tick sugar cane farm with a Librarian villager who buys paper to create a self-sustaining emerald farm. This allows you to generate a constant supply of emeralds, which can then be used to trade for other valuable items.
The Raid Farm
Build a raid farm to consistently trigger raids and defend your village. This will improve your reputation, leading to lower prices from villagers and access to Hero of the Village discounts.
Common Mistakes to Avoid
When working with the villager trading chart, it’s important to avoid common mistakes that can hinder your progress:
- Not Protecting Villagers: Protecting villagers from hostile mobs is crucial, as losing villagers can disrupt your trading network and require you to breed new ones.
- Over-Trading: Trading too much of a particular item can lock the trade, requiring you to wait for the villager to restock.
- Ignoring Village Reputation: Neglecting your reputation within the village can lead to higher prices and make trading less efficient.
- Not Understanding Workstations: Failing to understand the importance of workstations can prevent villagers from acquiring professions or restocking their trades.
The Future of Villager Trading Charts
The villager trading chart is subject to change with each Minecraft update. Mojang regularly tweaks villager trades to balance the game and introduce new features. Staying up-to-date with the latest patch notes and community discussions is essential for maintaining optimal trading strategies.
Conclusion
Mastering the Minecraft villager trading chart is a rewarding endeavor that can significantly enhance your gameplay experience. By understanding the professions, levels, and mechanics of the system, you can unlock a wealth of resources and create a thriving village economy. So, dive in, experiment with different strategies, and become a master of villager trading! Remember that the villager trading chart is a valuable tool, and understanding how it works will make you a better Minecraft player. The dynamic nature of the villager trading chart keeps the game interesting. Always refer to the most up-to-date villager trading chart for the version of Minecraft you are playing. The villager trading chart is your key to unlocking the full potential of your village. Understanding the villager trading chart also allows for more efficient resource management. The villager trading chart can be complex, but with practice, you’ll master it. Don’t forget to consult the villager trading chart before starting a new trading venture. The villager trading chart can also help you acquire rare items. The villager trading chart is an essential guide for any serious Minecraft player. Remember the villager trading chart when planning your next trading session. The villager trading chart is constantly evolving, so stay updated! Knowing the villager trading chart will give you a competitive edge.
[See also: Minecraft Village and Pillage Update Guide]
[See also: How to Build a Minecraft Villager Breeder]
[See also: The Ultimate Minecraft Resource Pack Guide]
