Decoding MOA on a Red Dot Sight: A Comprehensive Guide
Understanding Minute of Angle (MOA) is crucial when using a red dot sight, especially for precision shooting and accurate target acquisition. The term ‘MOA on a red dot‘ refers to the size of the red dot projected onto the target at a specific distance. This article dives deep into what MOA means, how it affects your shooting, and how to adjust your red dot sight for optimal performance. Whether you’re a seasoned marksman or a beginner, grasping the concept of MOA on a red dot will significantly improve your accuracy and confidence.
What is Minute of Angle (MOA)?
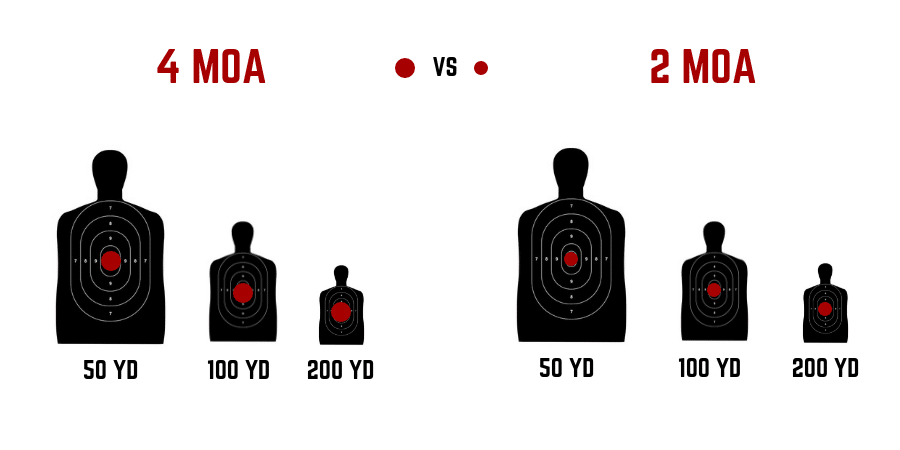
Minute of Angle, or MOA, is an angular measurement commonly used in shooting to describe the precision of a firearm or optic. One MOA is approximately 1/60th of a degree. To put it simply, MOA on a red dot represents the area covered by the red dot at a given distance. At 100 yards, one MOA equals roughly 1 inch. This means a 2 MOA red dot will cover a 2-inch area at 100 yards, a 4 MOA red dot will cover a 4-inch area, and so on. The relationship between distance and MOA is linear, allowing for easy adjustments at different ranges.
The Math Behind MOA
The actual calculation for MOA involves a bit of trigonometry, but for practical purposes, the following approximations are widely used:
- 1 MOA at 100 yards = 1.047 inches (often rounded to 1 inch)
- 1 MOA at 50 yards = 0.524 inches (often rounded to 0.5 inches)
- 1 MOA at 200 yards = 2.094 inches (often rounded to 2 inches)
These approximations are accurate enough for most shooting applications. Understanding these values helps you estimate the impact of your adjustments when zeroing your red dot sight. Knowing the MOA on a red dot allows for predictable corrections based on observed bullet impacts.
Understanding MOA on a Red Dot Sight
Red dot sights come in various MOA sizes, typically ranging from 1 MOA to 8 MOA. The size of the red dot affects both speed and precision. Smaller MOA dots (1-2 MOA) are ideal for precision shooting at longer distances because they cover less of the target, allowing for a more precise aiming point. Larger MOA dots (4-8 MOA) are better suited for close-quarters combat (CQB) and rapid target acquisition because they are easier to see quickly.
Choosing the Right MOA Size
The ideal MOA on a red dot depends on your intended use. Consider the following factors:
- Target Distance: For longer-range shooting, a smaller MOA is preferable. For close-range shooting, a larger MOA is often better.
- Target Size: Smaller targets require a smaller MOA dot to avoid obscuring the target.
- Shooting Speed: For faster target acquisition, a larger MOA dot is easier to see and acquire quickly.
- Personal Preference: Some shooters prefer a larger or smaller dot regardless of the application.
Many shooters find that a 2-4 MOA red dot provides a good balance between precision and speed, making it a versatile choice for various shooting scenarios. A larger MOA on a red dot might be beneficial for aging eyes or those with less than perfect vision, aiding in quick target acquisition.
Adjusting Your Red Dot Sight Using MOA
Most red dot sights have adjustment turrets that allow you to move the point of impact of your shots. These turrets are typically marked in MOA. For example, a turret might be labeled “1/2 MOA per click,” meaning each click of the turret will move the point of impact by 1/2 inch at 100 yards.
Zeroing Your Red Dot Sight
Zeroing is the process of adjusting your red dot sight so that your shots hit where you aim at a specific distance. Here’s how to zero your red dot sight using MOA adjustments:
- Set Up: Place a target at your desired zeroing distance (e.g., 25 yards, 50 yards, or 100 yards).
- Shoot a Group: Fire a group of 3-5 shots at the target.
- Analyze: Observe where your shots are hitting relative to your point of aim.
- Adjust: Use the MOA adjustment turrets to move the point of impact to the center of the target. Remember, 1 MOA moves the point of impact approximately 1 inch at 100 yards, 0.5 inches at 50 yards, and 0.25 inches at 25 yards.
- Repeat: Repeat steps 2-4 until your shots are consistently hitting the center of the target.
For example, if your shots are hitting 2 inches low and 1 inch to the right at 100 yards, you would need to adjust your red dot sight up by 2 MOA and left by 1 MOA. Understanding the MOA on a red dot and its adjustments is critical for accurate zeroing.
Making Adjustments in the Field
Once your red dot sight is zeroed, you can use your knowledge of MOA to make adjustments in the field for different distances or wind conditions. For example, if you know that your bullet drops 4 inches at 200 yards, you can adjust your red dot sight up by 2 MOA to compensate for the drop. Similarly, if you are shooting in a crosswind, you can use MOA adjustments to compensate for wind drift. Mastering MOA on a red dot allows for quick and accurate adjustments in dynamic shooting environments.
Benefits of Understanding MOA on a Red Dot
Understanding MOA on a red dot offers several key benefits:
- Improved Accuracy: Precise adjustments lead to tighter shot groups.
- Faster Zeroing: Knowing MOA values speeds up the zeroing process.
- Better Long-Range Shooting: Compensate for bullet drop and wind drift more effectively.
- Increased Confidence: Greater understanding of your equipment leads to more confident shooting.
- Enhanced Versatility: Adapt to different shooting scenarios and distances with ease.
By mastering the concept of MOA on a red dot, you’ll be well-equipped to handle a wide range of shooting challenges and improve your overall performance.
Common Misconceptions About MOA and Red Dots
Several misconceptions surround the use of MOA with red dot sights. Addressing these can further clarify the concept and its application.
- MOA is Only for Scopes: While MOA is often associated with magnified scopes, it’s equally relevant for red dot sights. The principle remains the same: it’s an angular measurement used for making adjustments.
- Smaller MOA is Always Better: A smaller MOA dot isn’t inherently better. It depends on the application. For close-quarters, a larger MOA can be faster.
- Red Dots are Inaccurate: Red dots, when properly zeroed and understood in terms of MOA, can be very accurate. They are often faster to acquire than traditional iron sights, especially in dynamic situations.
Clearing up these misconceptions allows for a more informed approach to using MOA on a red dot and selecting the right optic for your needs.
Advanced Techniques Using MOA with Red Dots
Beyond basic zeroing, understanding MOA can enable more advanced shooting techniques.
- Holdovers: Instead of adjusting the red dot for every distance, you can use holdovers, estimating how much higher or lower to aim based on the bullet’s trajectory.
- Windage Adjustments: Accurately compensating for wind requires understanding how much the wind will push the bullet at different distances, which can be translated into MOA adjustments.
- Target Ranging: While not as precise as a dedicated rangefinder, experienced shooters can estimate distances and use MOA to make educated guesses about target range.
These advanced techniques require practice and a solid understanding of ballistics, but they can significantly enhance your shooting capabilities using MOA on a red dot.
MOA vs. MRAD: Which is Better for Red Dots?
While MOA is more commonly used in the United States, Milliradian (MRAD) is another angular unit of measure used in optics. MRAD is based on metric units, with 1 MRAD equaling 1/1000th of the distance to the target. While both MOA and MRAD can be used with red dots, MOA is generally preferred due to its simpler relationship with inches at common shooting distances.
Key Differences Between MOA and MRAD
- Units: MOA is based on degrees, while MRAD is based on metric units.
- Adjustment Values: MOA adjustments are typically 1/4 MOA or 1/2 MOA per click, while MRAD adjustments are typically 0.1 MRAD per click.
- Ease of Use: MOA is often considered easier to use for shooters in the United States who are familiar with inches and yards.
Ultimately, the choice between MOA and MRAD comes down to personal preference. However, for most red dot applications, MOA on a red dot offers a more intuitive and straightforward approach.
Conclusion
Understanding MOA on a red dot is fundamental to maximizing the potential of your optic. Whether you’re zeroing your sight, making adjustments in the field, or engaging in advanced shooting techniques, a solid grasp of MOA will significantly improve your accuracy and confidence. By considering the size of the red dot, the target distance, and your shooting style, you can choose the right red dot sight and use it effectively to achieve your shooting goals. So, take the time to learn and practice with MOA, and you’ll be well on your way to becoming a more proficient and accurate shooter. Remember to always practice safe gun handling and follow all applicable laws and regulations. Further research into specific red dot models and their adjustment mechanisms will enhance your understanding and application of MOA on a red dot.
[See also: Choosing the Right Red Dot Sight for Your Needs]
[See also: Advanced Shooting Techniques with Red Dot Sights]
[See also: Maintaining and Caring for Your Red Dot Sight]
