How to Add Railing to Your Deck: A Comprehensive Guide
Adding railing to a deck is a crucial step in ensuring safety and enhancing the aesthetic appeal of your outdoor space. Whether you’re building a new deck or upgrading an existing one, understanding the process of installing railing is essential. This comprehensive guide will walk you through everything you need to know to successfully add railing to deck, from planning and preparation to installation and finishing touches. We’ll cover different types of railing, code requirements, necessary tools, and step-by-step instructions to help you achieve a professional-looking result.
Why Add Railing to a Deck?
The primary reason to add railing to deck is safety. Railings prevent falls, especially on elevated decks. They also provide a visual barrier, helping to define the edge of the deck and prevent accidental steps off. Beyond safety, railings contribute significantly to the overall look and feel of your deck. They can complement your home’s architecture and create a more inviting and finished space.
- Safety: Prevents falls and injuries.
- Aesthetics: Enhances the deck’s appearance.
- Code Compliance: Ensures adherence to building regulations.
- Property Value: Can increase the value of your home.
Types of Deck Railing
Choosing the right type of railing is critical for both safety and aesthetics. Here are some popular options:
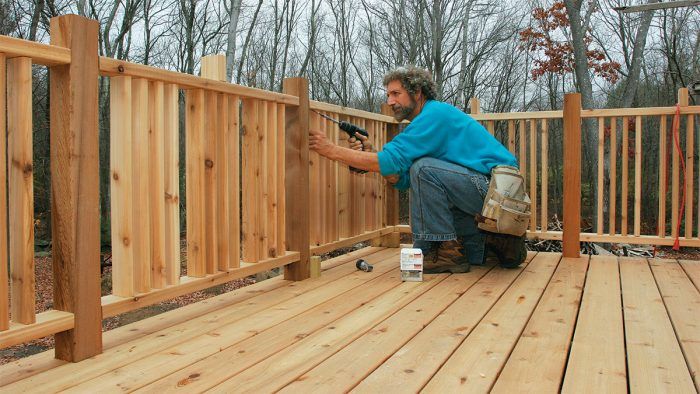
Wood Railing
Wood is a classic choice for deck railing. It’s versatile, relatively affordable, and can be stained or painted to match your home’s exterior. Common wood types include cedar, redwood, and pressure-treated lumber. However, wood requires regular maintenance to prevent rot and decay.
Composite Railing
Composite railing is made from a blend of wood fibers and plastic. It’s durable, low-maintenance, and resistant to rot, insects, and fading. Composite railing comes in various colors and styles, offering a wide range of design options. While it’s more expensive than wood, its longevity and reduced maintenance make it a worthwhile investment.
Metal Railing
Metal railing, such as aluminum or steel, offers a sleek and modern look. It’s strong, durable, and requires minimal maintenance. Metal railings are often powder-coated to prevent rust and corrosion. They can be more expensive than wood or composite options but provide a long-lasting and visually appealing solution.
Cable Railing
Cable railing features horizontal stainless steel cables strung between posts. This type of railing offers unobstructed views and a contemporary aesthetic. Cable railing requires precise installation to ensure proper tension and safety. It can be a more expensive option but offers a unique and stylish look.
Glass Railing
Glass railing provides a completely unobstructed view and adds a touch of elegance to any deck. It typically consists of tempered glass panels held in place by metal posts or frames. Glass railing is durable and easy to clean but can be more expensive than other options.
Planning Your Deck Railing Project
Before you begin the installation, careful planning is essential. Here are the key steps:
Check Local Building Codes
Building codes vary by location and dictate the height, spacing, and strength requirements for deck railings. Contact your local building department to obtain the necessary permits and ensure your project complies with all regulations. Failing to meet code requirements can result in fines and the need to redo the work.
Measure Your Deck
Accurate measurements are crucial for ordering the correct amount of materials. Measure the perimeter of your deck where you plan to install the railing. Consider any gates or stairs that will require additional railing components. It’s better to overestimate slightly and have extra material than to come up short.
Choose Your Materials
Select the type of railing that best suits your needs, budget, and aesthetic preferences. Consider the maintenance requirements, durability, and overall cost of each option. Order all necessary materials, including posts, rails, balusters, hardware, and fasteners.
Gather Your Tools
Having the right tools on hand will make the installation process smoother and more efficient. Here’s a list of essential tools:
- Measuring tape
- Level
- Drill/Driver
- Circular saw or miter saw
- Post-hole digger (if installing new posts)
- Concrete mix (if installing new posts)
- Safety glasses
- Gloves
- Pencil
- Wrench set
Step-by-Step Installation Guide
Now that you’ve planned your project and gathered your materials, it’s time to start the installation. Follow these steps to add railing to deck:
Install the Posts
The posts are the foundation of your railing system. They must be securely anchored to the deck frame. If you’re replacing existing posts, remove the old ones carefully. If you’re installing new posts, use a post-hole digger to create holes that extend below the frost line. Set the posts in concrete and ensure they are plumb (perfectly vertical) using a level. Allow the concrete to cure completely before proceeding.
Attach the Rails
The rails run horizontally between the posts, providing support and defining the top and bottom of the railing. Cut the rails to the appropriate length and attach them to the posts using screws or bolts. Ensure the rails are level and securely fastened. Consider using brackets or connectors for added strength.
Install the Balusters
Balusters are the vertical supports that fill the space between the rails. They prevent objects or people from falling through the railing. Measure and cut the balusters to the correct length. Space them evenly between the rails, ensuring they meet code requirements (typically no more than 4 inches apart). Attach the balusters to the rails using screws or nails.
Add Finishing Touches
Once the railing is installed, add any finishing touches to enhance its appearance. Sand any rough edges, fill nail holes with wood filler, and apply a stain or paint to match your home’s exterior. Consider adding decorative post caps or other embellishments to personalize your railing.
Maintaining Your Deck Railing
Regular maintenance is essential to keep your deck railing looking its best and ensure its longevity. Here are some tips:
- Clean your railing regularly with soap and water to remove dirt and debris.
- Inspect your railing for signs of damage, such as cracks, rot, or loose fasteners.
- Repair any damage promptly to prevent further deterioration.
- Apply a fresh coat of stain or paint every few years to protect the wood from the elements.
- For metal railings, check for rust and apply a rust-inhibiting coating as needed.
Safety Considerations
Safety should always be a top priority when add railing to deck. Wear safety glasses and gloves when working with power tools and materials. Ensure the railing is securely anchored to the deck frame to prevent accidents. If you’re not comfortable with any aspect of the installation, consider hiring a professional contractor. Remember to double check all measurements and follow the manufacturer’s instructions for all materials used.
Cost Considerations
The cost of add railing to deck can vary depending on the type of railing, the size of your deck, and whether you hire a professional contractor. Wood railing is typically the most affordable option, while metal and glass railings are more expensive. Labor costs can also add significantly to the overall cost of the project. Get multiple quotes from contractors to ensure you’re getting a fair price. Consider doing some of the work yourself to save money, but be sure to follow all safety precautions.
Troubleshooting Common Issues
Even with careful planning and execution, you may encounter some common issues when add railing to deck. Here are some troubleshooting tips:
- Wobbly Posts: Ensure the posts are securely anchored in concrete and plumb. If the posts are still wobbly, consider adding additional bracing.
- Uneven Rails: Use a level to ensure the rails are level before attaching them to the posts. If the rails are uneven, adjust the height of the posts as needed.
- Loose Balusters: Use screws or nails to securely attach the balusters to the rails. If the balusters are still loose, consider using construction adhesive.
- Code Violations: Double-check your work against local building codes to ensure compliance. If you find any violations, correct them immediately.
Conclusion
Adding railing to your deck is a worthwhile investment that enhances safety, aesthetics, and property value. By following this comprehensive guide, you can successfully add railing to deck and create a beautiful and functional outdoor space. Remember to plan carefully, choose the right materials, and follow all safety precautions. Whether you choose wood, composite, metal, or glass railing, the key is to ensure a secure and visually appealing installation. So, gather your tools, roll up your sleeves, and get ready to transform your deck into a safe and inviting oasis. Consider [See also: Deck Maintenance Tips] for keeping your deck in top shape, or [See also: Choosing the Right Decking Material] for future deck projects.
