My Kitchen Sink is Leaking: A Comprehensive Guide to Troubleshooting and Repair
Discovering that my kitchen sink is leaking is never a welcome surprise. It’s a common household problem that, if left unattended, can lead to water damage, mold growth, and higher water bills. But don’t panic! In many cases, you can diagnose and fix the kitchen sink leak yourself, saving time and money. This guide will walk you through the process, from identifying the source of the leak in your kitchen sink to implementing effective repair strategies.
Understanding the Anatomy of Your Kitchen Sink
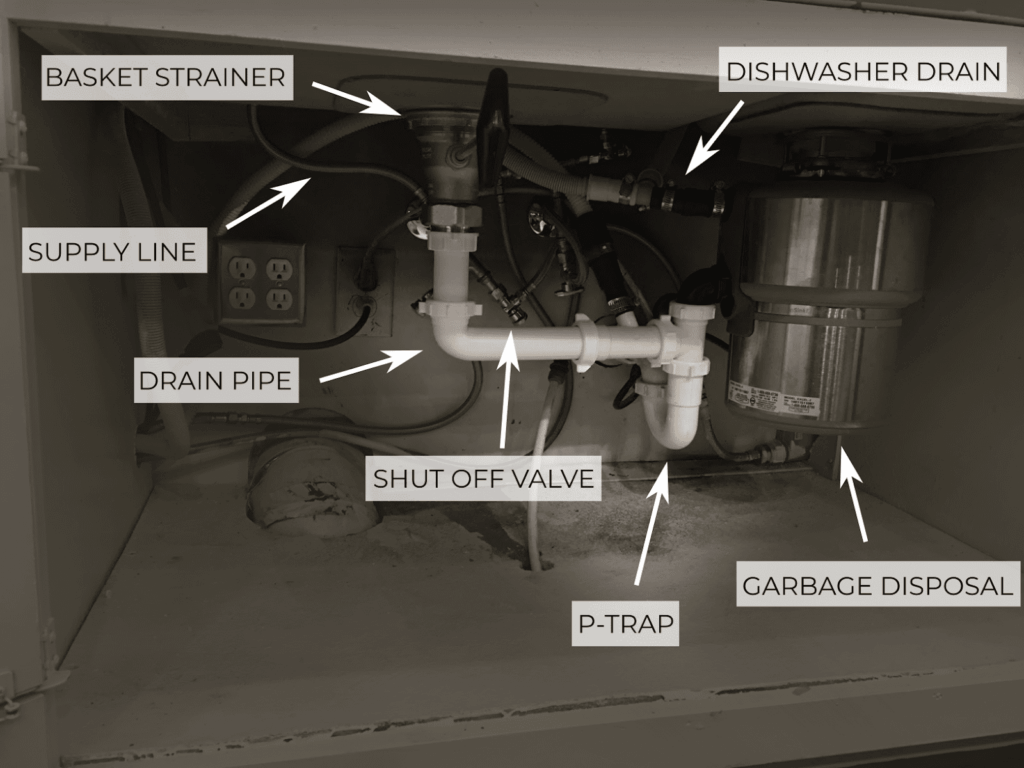
Before diving into troubleshooting, it’s helpful to understand the components of your kitchen sink plumbing. Key parts include:
- The Faucet: Where water comes out. Leaks can occur around the base, spout, or handles.
- The Supply Lines: Flexible tubes connecting the faucet to the water shut-off valves.
- The Shut-Off Valves: Allow you to turn off the water supply to the sink.
- The Sink Drain: The opening at the bottom of the sink.
- The Basket Strainer: Sits inside the drain opening and catches debris.
- The Tailpiece: The pipe connecting the basket strainer to the P-trap.
- The P-Trap: A U-shaped pipe that traps debris and prevents sewer gases from entering your home.
- The Drainpipe: Carries wastewater away from the P-trap.
Identifying the Source of the Leak
The first step in fixing my kitchen sink is leaking is pinpointing the exact location of the leak. Carefully inspect each component mentioned above. Here’s a systematic approach:
- Dry the Area: Use a clean cloth to dry all the pipes and connections under the sink.
- Run the Water: Turn on the faucet and observe where the water is coming from. Check both hot and cold water.
- Inspect the Faucet: Look for leaks around the base, spout, and handles.
- Check the Supply Lines: Feel for moisture along the length of the hoses and at the connections to the faucet and shut-off valves.
- Examine the Drain: Look for leaks around the basket strainer, tailpiece, P-trap, and drainpipe connections.
Common leak locations include:
- Faucet Base: Often caused by a worn-out O-ring or sealant.
- Faucet Handles: May indicate a worn cartridge or O-ring inside the faucet.
- Supply Line Connections: Usually due to loose connections or damaged compression rings.
- Basket Strainer: Can leak if the locknut is loose or the plumber’s putty is deteriorated.
- P-Trap Connections: Often leak because of loose slip nuts or damaged washers.
Tools and Materials You’ll Need
Before you start any repairs, gather the necessary tools and materials. Having everything on hand will make the process smoother and more efficient. Here’s a basic list:
- Adjustable Wrench: For tightening and loosening nuts and connections.
- Basin Wrench: Specifically designed for reaching tight spaces under the sink.
- Plumber’s Tape (Teflon Tape): For sealing threaded connections.
- Plumber’s Putty: For sealing the basket strainer to the sink.
- Screwdrivers (Phillips and Flathead): For removing faucet handles and other components.
- Bucket: To catch water during repairs.
- Clean Rags or Towels: For wiping up spills and drying surfaces.
- Replacement Parts: O-rings, washers, cartridges, supply lines, etc., as needed.
Repairing Common Kitchen Sink Leaks
Now that you’ve identified the source of the leak coming from my kitchen sink and gathered your tools, let’s look at how to fix some common problems:
Faucet Base Leak
A leak at the base of the faucet often indicates a worn-out O-ring or sealant. Here’s how to fix it:
- Turn Off the Water: Shut off the water supply to the sink using the shut-off valves.
- Disconnect the Supply Lines: Carefully disconnect the supply lines from the faucet.
- Remove the Faucet: Unscrew the mounting nuts that hold the faucet to the sink.
- Replace the O-Ring or Sealant: Clean the base of the faucet and replace the O-ring or apply a fresh bead of plumber’s putty.
- Reinstall the Faucet: Reattach the faucet to the sink and tighten the mounting nuts.
- Reconnect the Supply Lines: Reconnect the supply lines and turn the water back on. Check for leaks.
Faucet Handle Leak
Leaking faucet handles usually mean a worn cartridge or O-ring inside the faucet. Here’s how to address it:
- Turn Off the Water: Shut off the water supply.
- Remove the Handle: Remove the decorative cap on the handle and unscrew the screw holding the handle in place.
- Remove the Cartridge: Depending on the faucet type, you may need to use a special tool to remove the cartridge.
- Replace the Cartridge or O-Ring: Install a new cartridge or replace the O-rings on the old cartridge.
- Reassemble the Faucet: Reinstall the cartridge, handle, and decorative cap.
- Turn On the Water: Turn the water back on and check for leaks.
Supply Line Leak
A leak at the supply line connection typically means a loose connection or a damaged compression ring. Here’s how to fix it:
- Turn Off the Water: Shut off the water supply.
- Tighten the Connection: Use an adjustable wrench to tighten the connection. Be careful not to overtighten, as this can damage the fitting.
- Replace the Compression Ring: If tightening doesn’t stop the leak, replace the compression ring.
- Replace the Supply Line: If the supply line is damaged, replace it entirely.
- Turn On the Water: Turn the water back on and check for leaks.
Basket Strainer Leak
A leak around the basket strainer often indicates a loose locknut or deteriorated plumber’s putty. Here’s how to fix it:
- Turn Off the Water: Shut off the water supply.
- Loosen the Locknut: Use a basin wrench to loosen the locknut holding the basket strainer in place.
- Remove the Basket Strainer: Carefully remove the basket strainer from the sink.
- Clean the Area: Clean the sink opening and the basket strainer.
- Apply Fresh Plumber’s Putty: Roll a rope of plumber’s putty and press it around the underside of the basket strainer flange.
- Reinstall the Basket Strainer: Reinstall the basket strainer and tighten the locknut.
- Remove Excess Putty: Remove any excess plumber’s putty from around the edge of the strainer.
- Turn On the Water: Turn the water back on and check for leaks.
P-Trap Leak
Leaking P-trap connections usually mean loose slip nuts or damaged washers. Here’s how to fix it:
- Place a Bucket Under the P-Trap: To catch any water that spills out.
- Loosen the Slip Nuts: Loosen the slip nuts connecting the P-trap to the tailpiece and drainpipe.
- Inspect the Washers: Check the washers inside the slip nuts for damage. Replace them if necessary.
- Reassemble the P-Trap: Reassemble the P-trap and tighten the slip nuts.
- Turn On the Water: Run water down the drain to check for leaks.
When to Call a Plumber
While many kitchen sink leaks can be fixed DIY, there are situations where it’s best to call a professional plumber. Consider calling a plumber if:
- You’re uncomfortable working with plumbing.
- You can’t identify the source of the leak.
- The leak is severe or causing water damage.
- You’ve tried to fix the leak yourself, but it’s still leaking.
- You suspect there may be a more significant plumbing problem.
Ignoring a kitchen sink leak can lead to costly repairs down the road. [See also: Preventing Water Damage in Your Home] Addressing the issue promptly, whether you DIY or call a professional, will save you time, money, and headaches in the long run. Dealing with my kitchen sink is leaking requires patience and a systematic approach.
Preventing Future Leaks
Once you’ve fixed the kitchen sink leak, take steps to prevent future problems:
- Regularly Inspect: Periodically check under your sink for any signs of leaks or moisture.
- Tighten Connections: Ensure that all connections are snug, but not overtightened.
- Replace Worn Parts: Replace O-rings, washers, and cartridges as needed.
- Avoid Overloading the Sink: Be mindful of the weight you place in the sink, as excessive weight can strain the plumbing.
- Proper Drain Maintenance: Avoid pouring grease or food scraps down the drain, as this can lead to clogs and leaks.
By following these tips, you can keep your kitchen sink in good working order and prevent future leaks. Remember, regular maintenance is key to avoiding costly repairs.
Fixing my kitchen sink is leaking can seem daunting, but with the right knowledge and tools, it’s often a manageable DIY project. Remember to prioritize safety by turning off the water supply before starting any repairs. By following these steps, you can effectively troubleshoot and repair a kitchen sink leak, saving yourself time and money while maintaining your home’s integrity. Furthermore, understanding the components and taking preventative measures can significantly reduce the likelihood of future leaks. This proactive approach ensures that you are not constantly battling the same issues repeatedly. If you’re still struggling with my kitchen sink is leaking, don’t hesitate to call a professional; they have the expertise to diagnose and fix complex plumbing problems.
